
Heat boxes have been around for quite some time now, and for good reasons. Using a heat box is a non-toxic way of killing bed bugs in your carpets, behind baseboards, on your furniture, and in nooks and crannies.
However, it could leave you scratching your head if you don’t know how to use it. In this article, we will discuss in brief how heat boxes work, some of the precautions and warnings and a deeper dive into the topic.
So, without further ado, let’s delve in!
Table of Contents
Components of a Heat Box
Usually, you’ll find these components in a heat box (The appearance of some components may be different from the one represented as under)!
- Support block
- Support net
- The heating unit with integrated timer
- The carry bag
- Wireless thermometer
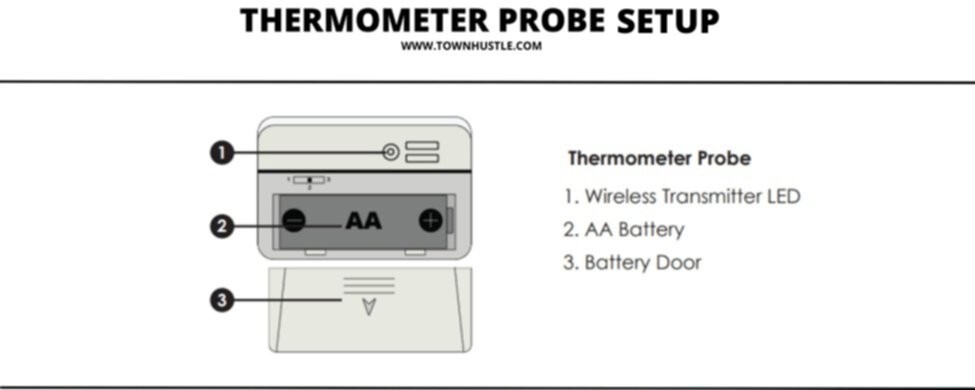
- The thermometer probe


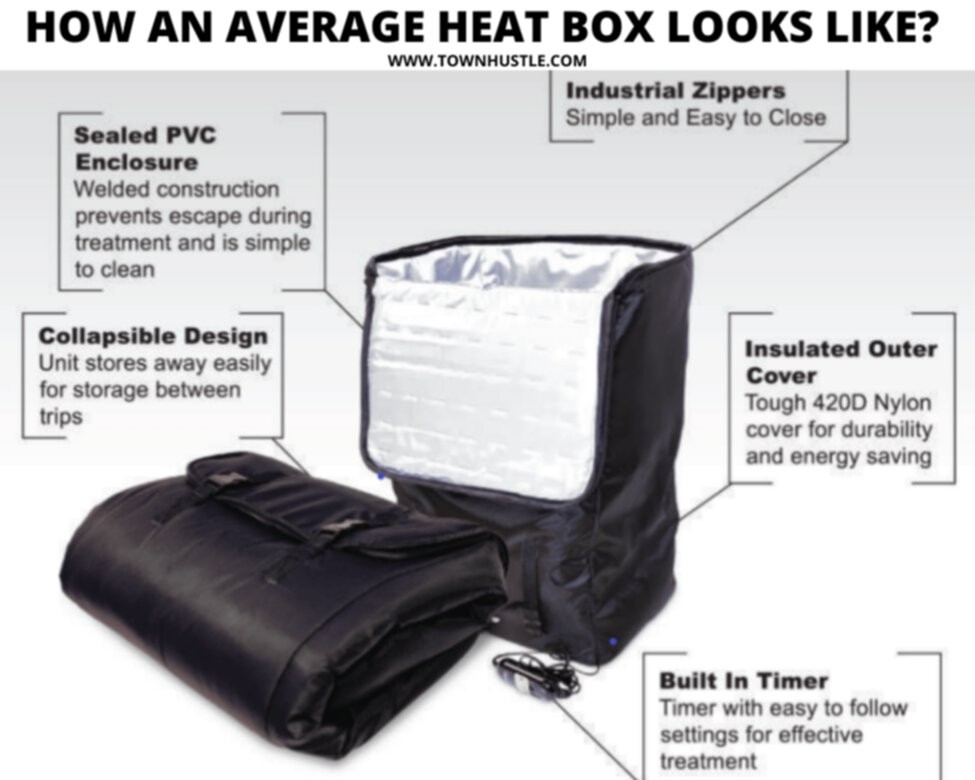
How an Average Heat Box Looks Like?
On average, heat box looks somewhat like this:

How to Use the Heat Box (Step-by-Step Guide)
Heat Box is an all-natural way to eliminate bed bugs with one treatment. It is environmentally safe as there are no leftover residuals such gases and chemicals that leave a negative impact on the ecosystem.
Thankfully, using a heat box is a walk-in-the-park. Anyone can manage to load the affected items inside the heat box for the heat treatment process. The following steps can make the operation of the heat box even easier for you.
1. Unfold the Oven
Having one side of the oven warped makes it smooth for it to fold without affecting its functionality. If you are having doubts about warping, shake the oven and make sure that each side panel has enough extension.


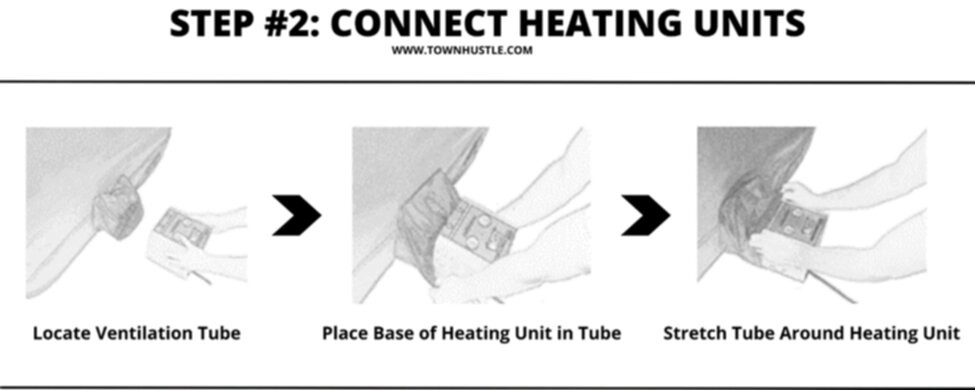
2. Connect Heating Units
First of all, locate the ventilation tube on the box. Now, carefully place the base of the heating unit in the tube. Then, expand the tube around the heater without covering the markings.

Safety Note:
The textured side of the heating unit and the ventilation tube often have gaps. There is no chance for bed bugs to escape these gaps with the heating unit turned on. The reason is that they experience thermal shock which keeps them from moving towards the heating unit. Keep a reminder to turn on the heating unit when you place infested items inside the heater box.
Also, make sure there is a 6-inch clearance around the heating unit while the operation is going on.
3. Select Appropriate Support Configuration
The modern support system of the heat boxes have room for plenty of items. Support blocks are specially designed to allow ventilation around rigid items as furniture and luggage. Space around books and clothing is also ventilated thoroughly by the combination of support blocks and a support net.
The support blocks are to be placed under the support net and the net itself is attached to the loops located inside the heater box.


Safety Note:
The items that you tend to heat treat must have air flowing around them. Inadequate airflow and densely packed items will take a long duration of time to reach the bed bug-killing temperature of 120°F (49°C).
The heater box gives a beep in case the items placed too close to the heater or airflow inside faces obstruction. Therefore, do not let the items touch your heater box in any way.
4. Locate Two Independent Power Outlets
The power for each heating unit must be delivered from its own circuit. Most of the residential and commercial buildings have one circuit for each room. For reaching the outlets in other rooms, you can use the extension cord.
There is one power extension cord in most of the heater box packages. Find a nearby electrical outlet and plug one of the heating units right into it.
Now, move on to another room that is operating on its own electrical circuit. There make a connection of the remaining heating units with this separate electrical outlet with the help of a power extension cord.
5. Insert Items for Heat Treatment
It’s time to place the infected items in the heat box for treatment. Place them on top of Support Blocks / Support Net. Items shouldn’t touch the walls or ceilings of the chamber to ensure adequate airflow.
Densely packed items will take longer to treat. Better air circulation will heat your items faster and ensure bed bug killing temperatures. Always use the included thermometer and thermometer probe. It’s best to buy one if none has been included.
Item that can be Treated
- clothes
- bedding
- shoes
- electronics
- children’s toys
- books
- files
- papers
- luggage
…and other household items.
But, Beware with these Items
Shoes: Shoe glue may soften and shoe soles may separate during heat treatment. Therefore, to avoid this, treat your shoes alone.
In a single layer in the center of the unit, place the sensor inside one of the shoes, and treat for 20 minutes at 120°F (49°F).
Electronics: For electronics, we recommend treating alone for 20 minutes at 120°F (49°F).
It is rare for electronics that are used to be infested, as the internal temperature of the device usually gets pretty warm. Think about your laptop or your gaming system fan turning on, this is to cool down your electronic device and bed bugs want to avoid the heat.
If you are still concerned about your electronic device you should consult the manufacturer for a maximum safe temperature before placing it in the Heat box. Always monitor the temperature to ensure that temperatures never exceed the indicated safe level.
Hint:
To ensure air circulation, always open luggage and “fluff” items while heat treatment process.
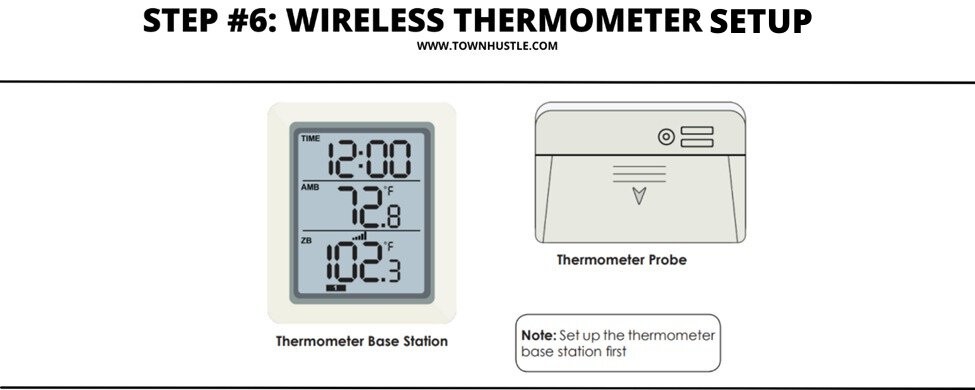
6. Wireless Thermometer Setup
Most of the heat boxes come with a thermometer base station and a thermometer probe to ensure a smooth user experience.
In this step, we’ll be locating the deepest – most insulated – location in the affected items being treated to place the wireless thermometer probe in there. After placing it, zip the top cover closed.

But before this all, let’s learn how to set the thermometer base station and probe!
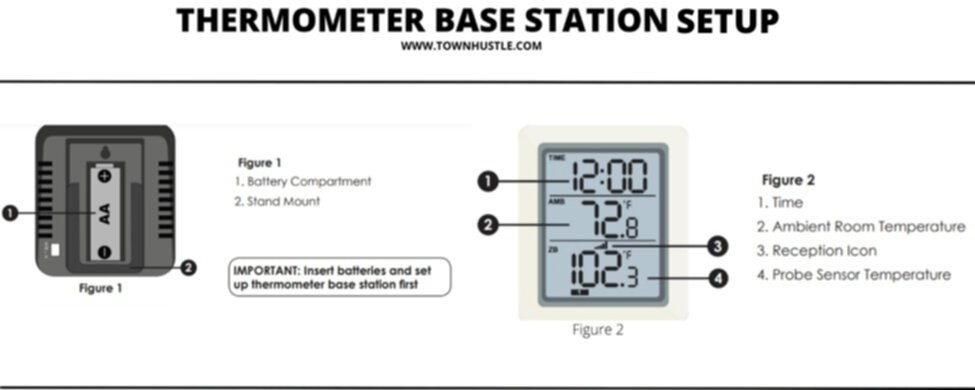
Thermometer Base Station Setup
So now is the time to set the Thermometer Base Station and here’s how you can do it!
- Remove the battery door on the back of the base station to insert one AA battery
- The lighting up of all the LCD segments for a few seconds is the sign that all segments are operating accurately
- The ambient temperature is displayed on the temperature base station
- However, the probe temperature takes a few minutes to show up on the screen after you insert batteries in the probe

Thermometer Probe Setup
- Just like a thermometer base station, insert an AA battery in the thermometer probe.
- The remote sensor LED indicator lights up for 4 seconds as soon as you place the battery. Afterward, it flashes once in a minute. The flashing is a sign of transmission of data.
- The thermometer base station has a reception icon in search mode.
- Now, look for the most insulated part of your luggage and place the wireless thermometer probe in it.
- Run the oven for an hour as soon as the temperature spikes 120°F in all three locations.
- The oven can take as many as 8 hours to reach 120°F and maintain it. Therefore, set the timer to 8 hours in case you are not around while the unit is operating.

Hint:
The temperature of the probe is visible on the thermometer as the ‘Out’ temperature. If the temperature reading is not seen, take the batteries out of both the probe and display screen at the same time. Insert the battery in the display screen first then the probe. The temperature will be visible now.
7. Turn On Heating Units
Now it’s time to turn on the heater. And here’s how to do it:
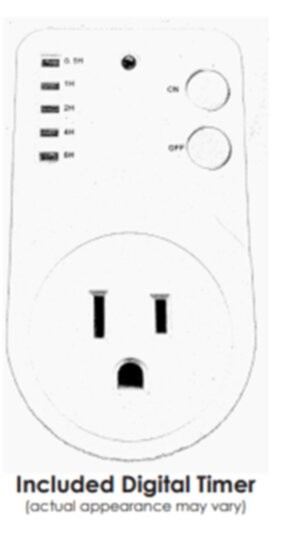
- Plug heater into the digital timer (you’ll find it in the box)
- Now plug the timer into the electric switch/ outlet
- Select eight (8) hours’ time on the digital timer
- Now press the ON button of the timer and your heater is all set

Safety Note:
Most of the times, the power unit of heat boxes draw up to 1500 watts of electrical power. So do not use extension cords rated below 1500 watts.
Hint:
Large loads require an 8-hour setting while small to medium loads can work smoothly under a 4-hour setting. You can check for the lethal temperature level by using the thermometer that comes with the set.
What to Do If Heating Unit is Not Turning On?
Usually, the heating unit is automatically powered on along with the timer after they are plugged in. If the heating unit is not turned on, check for the safety tip-over switch, located at the bottom of the red square heating unit.
For the heating unit to be turned on, this little black button needs to be pressed in. It has been designed specifically to automatically turn off in case the unit is knocked over.
Therefore, plug the heating unit into the wall outlet, and make sure that the red unit is flat on the ground. It will naturally press the button in, leading the heating unit to turn on.
8. Wait Appropriate Time
It is not feasible to note the temperature at every location in your items so experts have come up with a fool proof strategy for effective heat treatment.
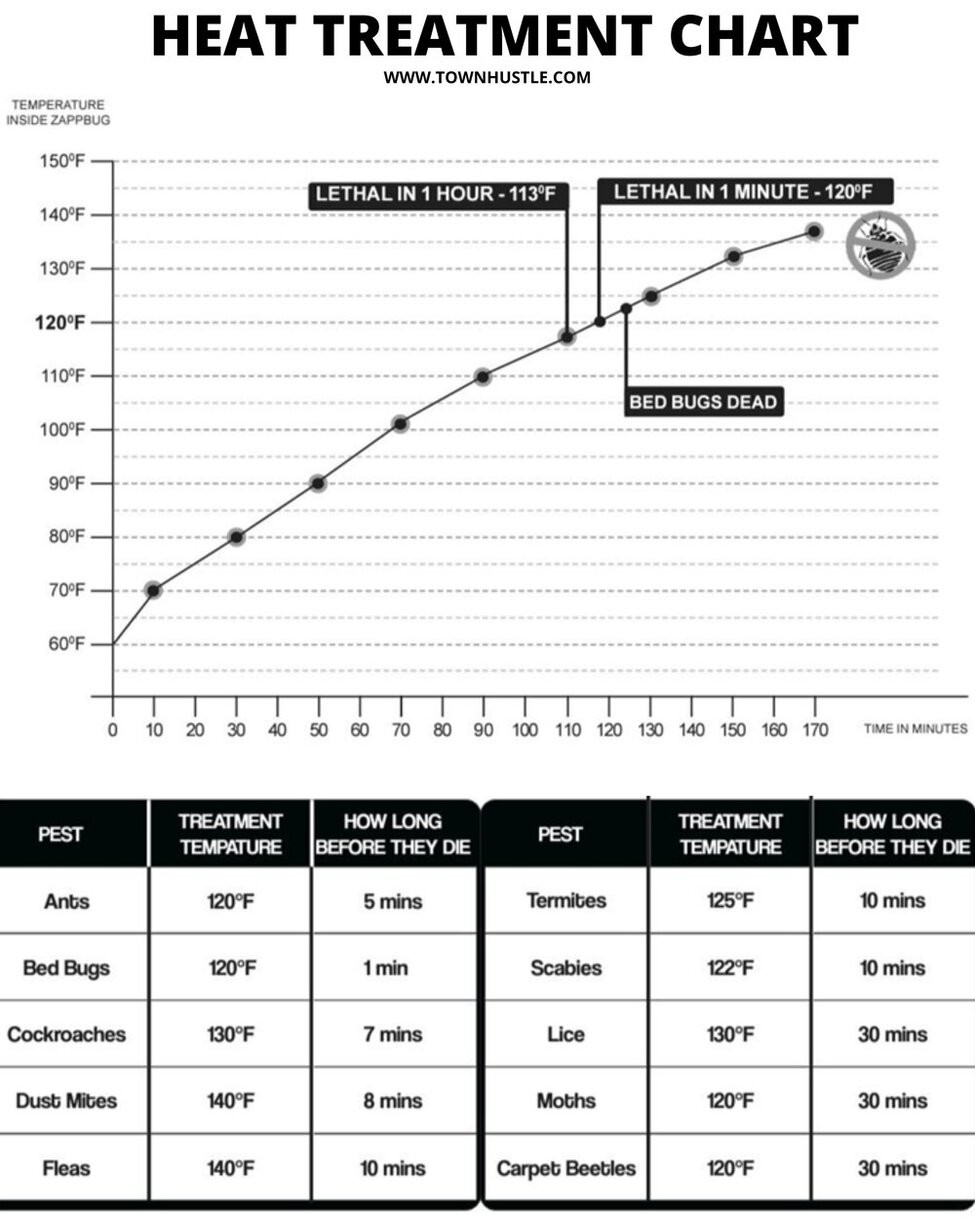
A temperature of 120°F kills bed bugs in less than two minutes. However, some of the experiments revealed that the temperature of 130°F is when bugs begin to die. Some say the higher the temperature, the faster the bugs die. The most common method is to set the temperature to 120°F and wait for almost an hour. It gets rid of every bug in your belongings.
9. Remove Items after Heat Treatment
Items are hot after heat treatment so you have to wait for a little before handling them. Be careful as metal zippers can cause burns if held immediately after the heat treatment.
You can place all the items into a sealed plastic bag right after the heat treatment and save yourself any expected damage.
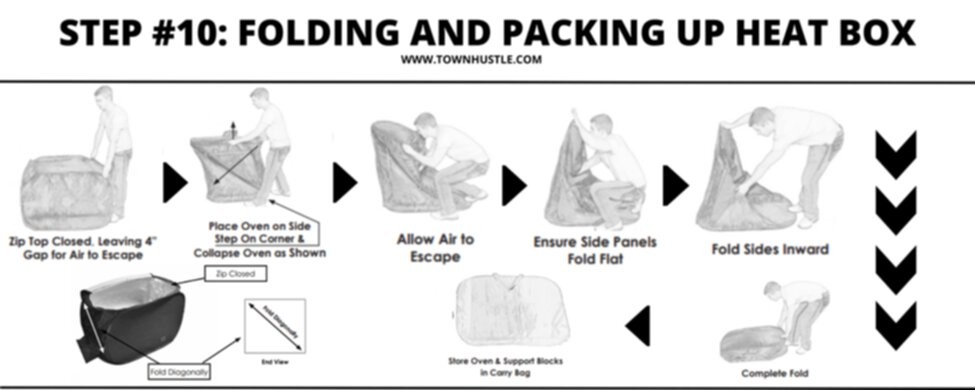
10. Folding and Packing Up the Heat Box
Now is the time to fold and pack the heat heat box. And this is how you’ll do it:
- Disconnect the power unit from the circuit.
- Close the top flap by zipping it after you let air escape.
- Now fold the heater diagonally as you push one of the four long edges across to the opposite long edge.
- Carefully place the folding oven, timer, thermometer, support blocks, and support net inside the bag.
- The storage of the heater should be done separately.

Heat Treatment Chart
It’s important to be noted that there can be some differences in actual heat treatment times. So, always add one hour more than necessary to treatment time to ensure bug mortality.

⚠Warnings
Before using the heat box, go through all the instructions and warnings to reduce any possible risk of fire, personal injury, or electric shock. Use the appliance as per the guidelines mentioned in the manual.
High power appliances like heat boxes consume more electric current than other household items, thereby having poor connections. It can lead to the overheating and melting of the outlet. Therefore, make sure the outlets you are using have strong electrical contact.
And more are:
- Remove any hindrance that blocks the air take or exhaust vents on the heater. Anything obstructing the intake or exhaust vent can cause overheating and then pose a fire hazard.
- Before you begin the operation, keep 6 inches clearance at least around the heating unit.
- Avoid the use of a heat box in an outdoor or wet environment. This product is designed to be used indoors only.
- Make sure there is no object entering into the ventilation fan while the heating unit is operating. It can result in personal injury and damage to the heat box itself.
- Never place any sort of flammable objects or aerosols inside the heater.
- Be careful of the items you are heat treating as some of them can be potentially damaged during the process. Materials made of antique leather and wood can face considerable damage if given inadequate heat.
- It is better to consult the manufacturer of items before placing those items in the heater.
- It is important to monitor the temperature. It is really dangerous if the temperature exceeds the recommended level.
Precautions
Now, here are a few precautions that must be taken for the safe use of high power heat boxes!
Inspect Outlet Connection and Contact Strength
Place a standard two-prong plug into the outlet and ensure that the resistance offered by both the prong connections is equal and strong.
In some cases, one prong is not strong enough and is easily inserted than the other. If this happens, that outlet is highly unsafe to be used for a high-power heat box. Contact an electrician to check up on the outlet or replace it yourself.
Inspect Outlets and Plugs after Each Use
Every time you use the outlets and plugs, do a thorough inspection and see if they are operating smoothly.
Extension Cords
Some people face the problem of their extension cord getting dangerously overheated and probably leading to fire. The reason behind overheating is that not all extension cords can carry the current load drawn by the heating unit.
Therefore, experts have recommended that only cords more than 1500 watts, or 15 amps, and 16 gauge size should be used in high power heat boxes. It is also important to see that the cord you are using has the UP seal.
Old electrical wiring and outlets
Each heating unit of the heat box draws as much as 12-15 ampere current (1500 watts) and resultantly, it needs to run on circuits rated 15 amperes or more than that. It is possible that old electrical wiring and outlets are unable to sustain the loads and they ultimately lead to serious damage, personal injuries, and fire.
If you are not sure whether the electrical wiring and outlets are new or old, reach out to your electrician before operating the heat box. If you feel that the electrical cord is hot to touch or the cord itself is deformed, unplug it as soon as possible and call customer service.
Hints and Tips to Eliminate Bedbugs with Heat Treatment
Bed Bugs
- According to researchers, bed bugs are most likely to die quickly at a temperature of 120°F or above, no matter which life stage they are in.
- It is very difficult and translucent to detect bed bugs and their eggs.
- Treat all the items with heat even if there are no bed bugs found in the vicinity.
- Bed bugs can survive for 18 months without feeding on anything. Therefore, make sure you heat treat all the potentially infested items for 18 months.
- Bed bugs have the ability to slip into tiny cracks by flattening their bodies. So, beware!
- There is no chance for bed bugs to climb smooth surfaces like the lining of the heater.
The Heat Box
- The support blocks and support nets make sure that maximum air is circulated all around your belongings. The densely packed items make it hard for bed bugs to die because it takes more time to heat.
- Before you place the potentially infested items inside the heating unit, turn it on.
- It is only to be used indoors with an ambient room temperature of 70°C or above. The heating unit has a working principle of adding heat to the air coming out of the room where it is located. The ambient temperature below 70°C is not effective in killing the bed bugs.
- Use a thermometer and thermometer probe to monitor the temperature inside the heater.
- Avoid placing the heater directly on cold floors like floors made of concrete. The surfaces at 70°F or more are ideal for placing the heater box.
Why Should You Use a Heat Box
Here are some of the benefits that you can expect from heat box treatment:
Bed Bugs Can’t Hide From the Heat Box
It is a known fact that bugs move very fast and they don’t take long to crawl into a hiding place as soon as they see a threat. They tend to hide in places that are not readily accessible.
However, heat boxes can access bugs in every void and corner in your furniture and walls and eliminate these irritating pests.
Heat Box Kills Insecticide-Resistant Bed Bugs
Nowadays, it has become problematic to eradicate bed bugs with pesticides alone because these bugs keep on developing skin that is more resistant to pesticides.
It is also possible for them to produce more resistant offspring. Heat box has the ability to remove both pesticide-resistant and normal bed bugs with equal effectiveness.
Heat boxes kill bed bugs no matter which stage of development they are in. It is possible that bed bug eggs might survive fumigation done by a pest control company. Heat box doesn’t leave any bed bug behind, let it be their eggs or their insecticide-resistant nature.
This is why it is one of the best methods to kill bed bugs at large.
Fast Action
Unlike other methods of control, Heat Box completes its task in hours. If you use chemicals to kill bed bugs, you will have to make follow-up visits and re-treatment processes. However, with a heat box, you get to treat the bug infestation in a few hours on the very same day.
It also saves you from spending money on a hotel for residence as you don’t have to move out at all. It’s all just a matter of a few hours. You can also get back to your home immediately after the treatment is done. The reason is that chemicals need time to dissipate, but the heat box has no such restrictions.
Effortless Operation
There is no need for you to evacuate the adjacent areas or remove furniture or other household belongings as the heat box continues operation through the entire structure and everything inside.
The Best Heat Boxes to Buy
Many heat boxes exist on the market. It’s important to purchase an heat box the match your needs.
For a detailed insight into each heat box available on the market, kindly head towards this article for an in-depth analysis. This’ll also help you in making a wise purchase via its comprehensive buying guide.
FAQs
What heat kills bed bugs instantly?
Adult bed bugs die at the temperature of 120°F. However, the temperature range may vary for the bugs’ eggs. They may require as much as 125°F temperature. It also depends on how much time you keep the heat box on.
Does the bed bug heat box really work?
Bed bug heat box is one of the most effective methods to kill bugs in a short time without causing any harmful damage to the user or environment. It gets rid of all stage of bed bugs, be it eggs, nymphs and adults.
Is bed bug heat box treatment expensive?
The price range for bed bug heat boxes varies as per their company. The heat box with a small capacity can be bought at a reasonable price. On the other hand, the large capacitated heat box is a little expensive.
Is it dangerous to operate a heat box?
Heat box treatment is safe to operate all by yourself. However, you have to monitor the unit for as long as it runs. The reason is that the airflow blockage can heat some of the components so take suitable precautions to avoid any of such happening.
Do I need professional assistance to operate my heat box treatment?
There is a manual with every heat box package that has simple guidelines for operating the heat box. You don’t really need any professional assistance to get started with the heat treatment. It is really easy and simple.
What are the variations in the heat box?
There exists a huge range of variety among capacities of heat boxes. Some of them have little capacity and they are used for removing infestations from small items. However, there are also large capacitated heat boxes on the market to remove bed bugs from large objects.
Final Thoughts
Bed bugs are a pain in the neck for hotels and homeowners. Those having trouble with bed bugs may have to turn up the heat box to eradicate those annoying creatures.
The heat box has a working mechanism like a convection oven. All the room furniture is placed at the centre of the room, and an oven is created around it using solution boards.
We have discussed how to use it and also shared some proven tips to get the most of it. Say goodbye to bed bugs once and for all and get yourself a heat box.